最近在研究 apisix 插件,想要研究插件的执行流程,为了了解插件的具体运行流程,查看了几种方法来调试:1. inspect plugin 2. 自定义插件调试 等等。
本文介绍了添加启用自定义插件。
简单修改插件#
最近在研究 apisix 的 proxy-cache 插件,本文就以 proxy-cache 插件为例子来讲解 docker 环境下如何自定义插件。
我们先从 apisix 官方git库拷贝 proxy-cache 插件代码到本地文件夹。我们对插件的内容进行修改删除,并将插件名称修改为 proxy-cache2, 修改后的插件文件列表如下:
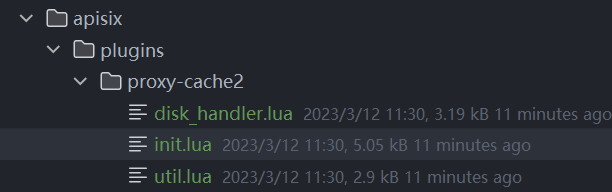
删除了内存缓存的相关内容,只保留了磁盘缓存的内容,并添加了一些日志记录好了解整个插件的整体流程。
apisix 添加自定义插件#
接下来需要给 apisix 添加我们修改的 proxy-cache2 插件,通过查看容器的目录,我们需要将插件挂载到 /usr/local/apisix/apisix/plugins 目录下,我们修改 docker-compose 文件:
 1
 2
 3
 4
 5
 6
 7
 8
 9
10
11
12
13
14
15
16
17
18
19
20
21
| version: "3"
services:
apisix:
image: apache/apisix:${APISIX_IMAGE_TAG:-3.2.0-debian}
restart: always
volumes:
- ./apisix_conf/config.yaml:/usr/local/apisix/conf/config.yaml:ro
- ./apisix/plugins/proxy-cache2:/usr/local/apisix/apisix/plugins/proxy-cache2
- ./apisix_log://usr/local/apisix/logs
depends_on:
- etcd
##network_mode: host
ports:
- "9180:9180/tcp"
- "9080:9080/tcp"
- "9091:9091/tcp"
- "9443:9443/tcp"
- "9092:9092/tcp"
networks:
apisix:
|
我们添加 ./apisix/plugins/proxy-cache2:/usr/local/apisix/apisix/plugins/proxy-cache2 将本地的插件目录挂载进行容器中,重启 apisix。
执行 curl "http://127.0.0.1:9180/apisix/admin/plugins/list" -H 'X-API-KEY: edd1c9f034335f136f87ad84b625c8f1'

可以看到插件已经添加成功了。
apisix dashboard 添加自定义插件#
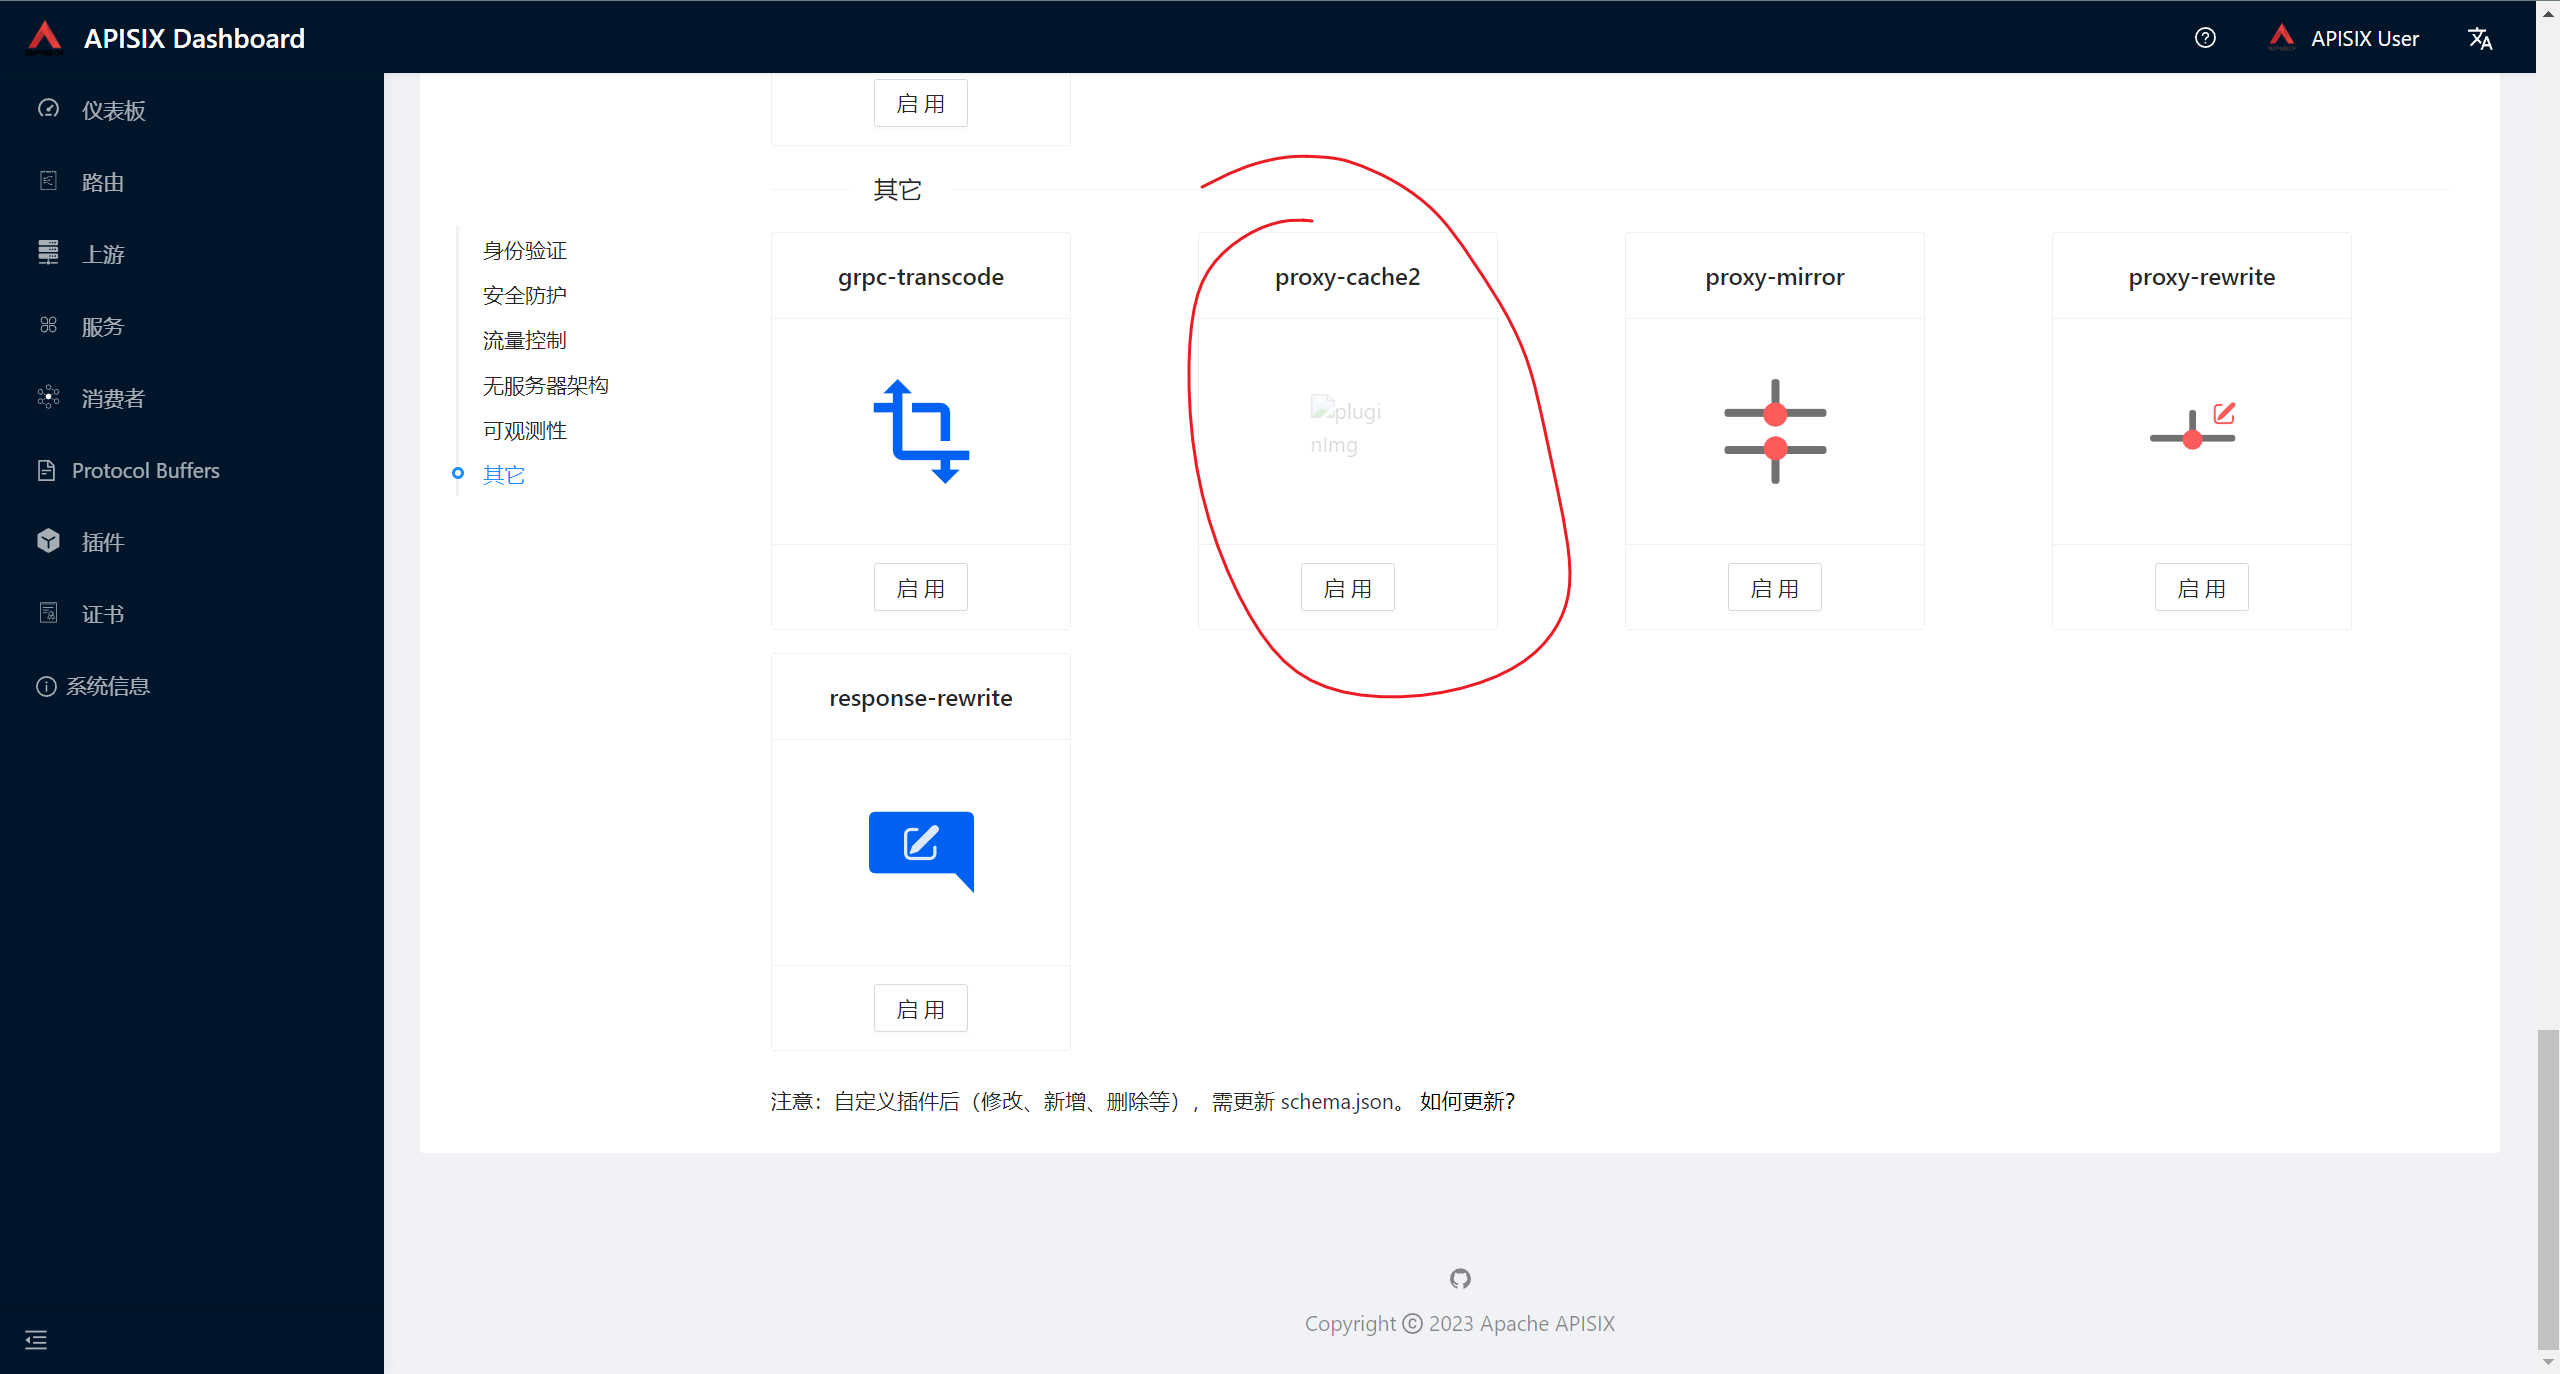
apisix 已经成功添加我们自定义的插件了,但我们打开 dashboard 发现我们的自定义插件没有添加成功,接下来讲述如何在 dashboard 添加我们的插件。
执行命令导出 schema.json 文件#
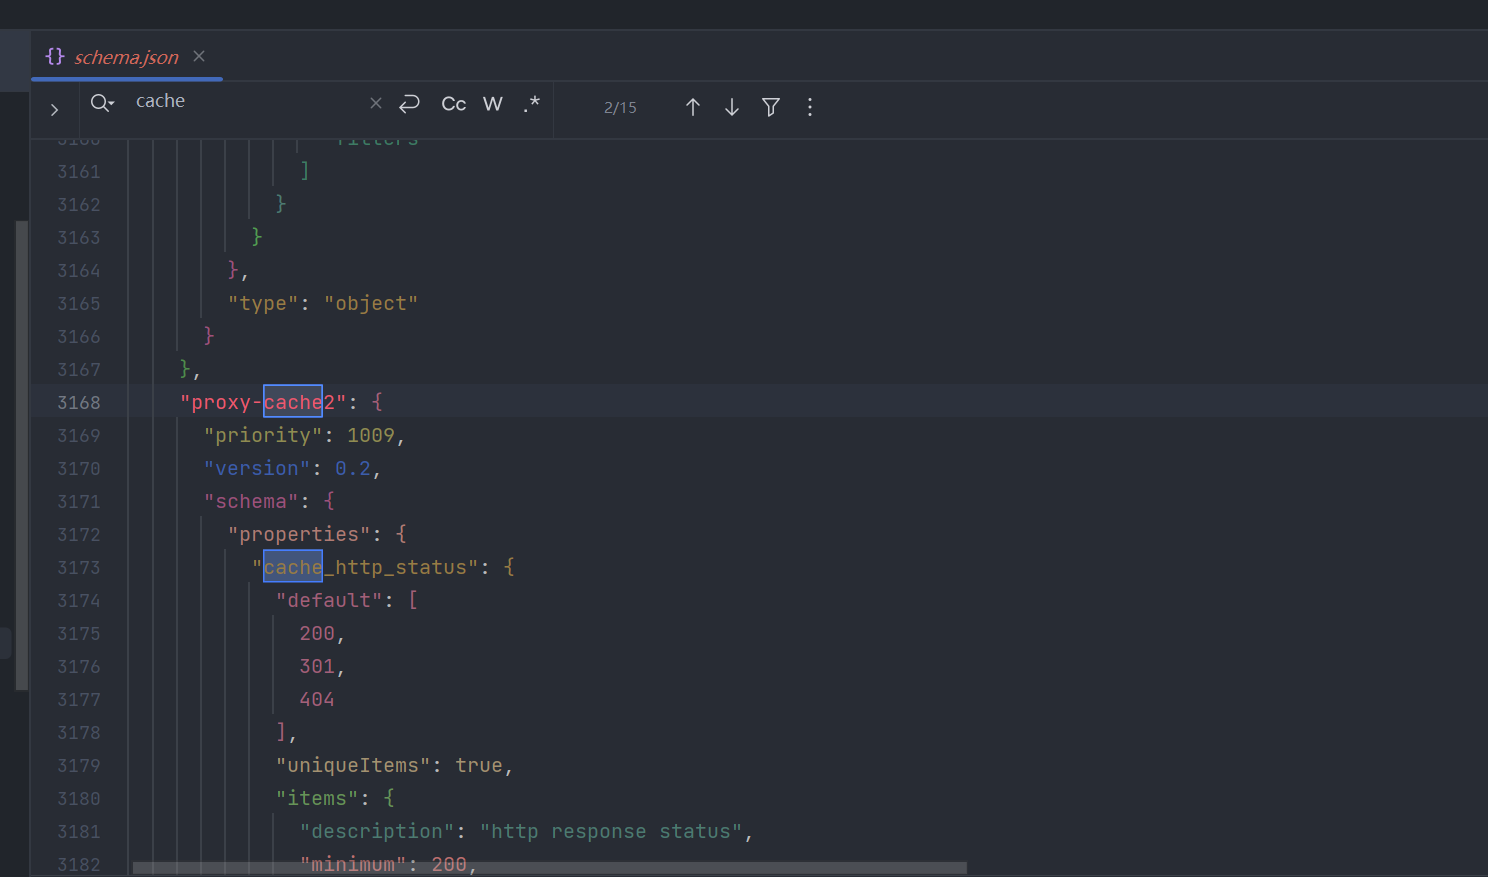
我们通过 curl 127.0.0.1:9092/v1/schema > schema.json 可以导出 schema.json 文件,
将 schema.json 文件挂载进 dashboard 容器中#
接下来我们只需将 schema.json 挂载进 dashboard 容器即可,修改后的 compose 文件如下:
 1
 2
 3
 4
 5
 6
 7
 8
 9
10
11
12
13
14
15
16
17
18
19
20
21
22
23
24
25
26
27
28
29
30
31
32
33
34
35
36
37
38
39
40
41
42
43
44
45
46
47
48
49
50
51
52
53
54
55
56
57
58
59
60
61
62
63
64
65
66
67
68
69
70
71
72
| #
# Licensed to the Apache Software Foundation (ASF) under one or more
# contributor license agreements. See the NOTICE file distributed with
# this work for additional information regarding copyright ownership.
# The ASF licenses this file to You under the Apache License, Version 2.0
# (the "License"); you may not use this file except in compliance with
# the License. You may obtain a copy of the License at
#
# http://www.apache.org/licenses/LICENSE-2.0
#
# Unless required by applicable law or agreed to in writing, software
# distributed under the License is distributed on an "AS IS" BASIS,
# WITHOUT WARRANTIES OR CONDITIONS OF ANY KIND, either express or implied.
# See the License for the specific language governing permissions and
# limitations under the License.
#
version: "3"
services:
apisix-dashboard:
image: apache/apisix-dashboard:3.0.0-alpine
restart: always
volumes:
- ./dashboard_conf/conf.yaml:/usr/local/apisix-dashboard/conf/conf.yaml
- ./dashboard_conf/schema.json:/usr/local/apisix-dashboard/conf/schema.json
ports:
- "9000:9000"
networks:
apisix:
apisix:
image: apache/apisix:${APISIX_IMAGE_TAG:-3.2.0-debian}
restart: always
volumes:
- ./apisix_conf/config.yaml:/usr/local/apisix/conf/config.yaml:ro
- ./apisix/plugins/proxy-cache2:/usr/local/apisix/apisix/plugins/proxy-cache2
- ./apisix_log://usr/local/apisix/logs
depends_on:
- etcd
##network_mode: host
ports:
- "9180:9180/tcp"
- "9080:9080/tcp"
- "9091:9091/tcp"
- "9443:9443/tcp"
- "9092:9092/tcp"
networks:
apisix:
etcd:
image: bitnami/etcd:3.4.15
restart: always
volumes:
- etcd_data:/bitnami/etcd
environment:
ETCD_ENABLE_V2: "true"
ALLOW_NONE_AUTHENTICATION: "yes"
ETCD_ADVERTISE_CLIENT_URLS: "http://etcd:2379"
ETCD_LISTEN_CLIENT_URLS: "http://0.0.0.0:2379"
ports:
- "2379:2379/tcp"
networks:
apisix:
networks:
apisix:
driver: bridge
volumes:
etcd_data:
driver: local
|
我们重启容器,可以看到自定义插件已经添加成功了。
本文简单介绍了 apisix 如何启用自定义插件来帮助我们加强 apisix 网关的能力。